

In this blog post, we'll understand the process of creating a Continuous Integration and Continuous Deployment (CICD) pipeline using GitHub Actions for a Spring Boot application, along with MongoDB and Redis servers, all within the convenience of Docker. So, Let's explore GitHub Actions and Docker to effortlessly automate our build and deployment process on EC2.
Prerequisites
EC2 instance
Spring boot application
Step 1: Install docker on EC2
Install docker on your Ubuntu EC2 instance with the below commands.
sudo apt-get update
sudo apt-get install docker.io
To use docker without sudo, Give the user permission to docker.
sudo usermod -aG docker $USER
After hitting the above command, we need to reboot the system to get it to work.
sudo reboot
Now, you are ready to use docker without using sudo. So you can check your docker version with the below command.
docker --version
Step 2: Start Mongo and Redis service with Docker image
As we are using MongoDB and Redis in the application we need to set those as well. instead of installing those manually let's take advantage of docker to run MongoDB and Redis on the EC2 server.
docker run --name mongo -e MONGO_INITDB_ROOT_USERNAME=your_username -e MONGO_INITDB_ROOT_PASSWORD=your_password -p 27017:27017 -v /data:/var/lib/mongo/data -d mongo
Here, we are pulling a Mongo image from the docker hub, setting the Mongo username and password, specifying the port to run our Mongo container, and attaching volume in case we lose our container.
docker run --name redis -p 6379:6379 -v /data:/var/lib/redis/data -d redis
The same we have done for Redis and started both containers in detached mode with -d flag.
You can check your running containers with the command.
docker ps
You will be able to see your running Mongo and Redis containers.

Also, you can check the Mongo connection using a Mongo compass.
Your application should have the same configuration as done for the containers. You need to add MongoDB and Redis configuration to the application.properties or application.yml file.
spring:
  data:
    mongodb:
      database: your_db_name
      host: mongo
      username: your_username
      password: your_password
      authentication-database: admin
      port: 27017

  redis:
    port: 6379
    host: redis
Step 3: Dockerize your spring boot application
Clean Build your spring boot application with mvn clean install.
mvn clean install
Now, let's create a Dockerfile to Dockerize the spring boot application and add it to Dockerhub.
FROM openjdk:17
ENV SPRING_PROFILES_ACTIVE=dev
ADD target/my-springboot-server.jar my-springboot-server.jar
EXPOSE 7098
ENTRYPOINT [ "java", "-jar", "my-springboot-server.jar" ]
Here, We are using an image openjdk:17 for the Java 17 version. Setting up the dev environment. Adding a jar file which is created after mvn clean install. Expose port to run your application if any by default it will be 8080, then the Entrypoint which will be the actual command to run your application i.e. java -jar my-springboot-server.jar .
Step 4: Create a GitHub Action script
Create a folder named .github/workflows in your repository folder. Create a .yml file to write your deployment script such as deployment.yml*.*
Here, we will create an action named Build & Deploy backend server that will get triggered on any push in the development branch. And schedule jobs that will be running on ubuntu-latest (EC2 instance). We will be adding steps to run a script in a decided flow.
name: Build & Deploy backend server

on:
  push:
    branches: [ "development" ]

permissions:
  contents: read

jobs:
  build:

    runs-on: ubuntu-latest

    steps:
Use GitHub's actions/checkout@v3 to checks-out your repository under $GITHUB_WORKSPACE, so your workflow can access it.
- uses: actions/checkout@v3
Install Java 17 using actions/setup-java@v3 .
      - name: Install Java 17 JDK
        uses: actions/setup-java@v3
        with:
          java-version: '17'
          distribution: 'zulu'
          cache: maven
Next step to build your application jar with mvn clean install .
      - name: Build with Maven
        run: mvn clean install
And here comes the action to build and push your image to Dockerhub, to push your image into Dockerhub you need to log in to your Dockerhub account, you need to pass your docker creds as it is not publically shareable, Hence we need to add those into secrets of a repository. In the next step, we will see how to add secrets to a repository.
Also login to your Dockerhub account from the EC2 machine as well so it can have access to pull your private image.
      - name: Build & Push Docker image
        uses: mr-smithers-excellent/docker-build-push@v5
        with:
          image: ${{secrets.DOCKER_USERNAME }}/your_dockerhub_repo
          tags: latest
          registry: docker.io
          dockerfile: Dockerfile
          username: ${{ secrets.DOCKER_USERNAME }}
          password: ${{ secrets.DOCKER_PASSWORD }}
With the above action, every new image will get pushed to Dockerhub and is ready to pull and run. So let's Write steps to Pull and Run the image.
      - name: Pull & Run Docker image
        uses: appleboy/ssh-action@master
        with:
          host: 13.212.244.119
          username: ubuntu
          key: ${{ secrets.ACTION_PRIVATE_KEY }}
          envs: GITHUB_SHA
          script: |
            docker login
            docker pull ${{ secrets.DOCKER_USERNAME }}/your_dockerhub_repo
            docker stop your_dockerhub_repo
            docker rm your_dockerhub_repo
            docker run --detach --name your_dockerhub_repo -p 7098:7098 ${{ secrets.DOCKER_USERNAME }}/your_dockerhub_repo
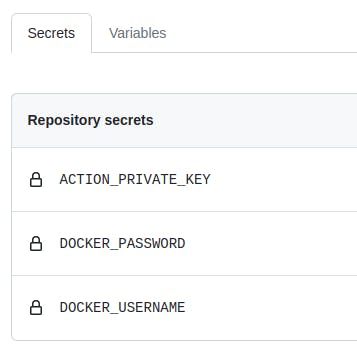
You need to add your ssh private key to your GitHub secrets ACTION_PRIVATE_KEY and add a public key to your EC2 machine so they can communicate and transfer data.
To successfully run your pipeline, you have to connect your repo with your EC2 by adding secrets.ACTION_PRIVATE_KEY Also, give Dockerhub access by adding secrets.DOCKER_USERNAME and secrets.DOCKER_PASSWORD .
Step 5: Add secrets to your GitHub Repo
Let's dive into how to set secrets to your GitHub repo.
Go to your repository settings.
Open Secrets and Variables under the security section.
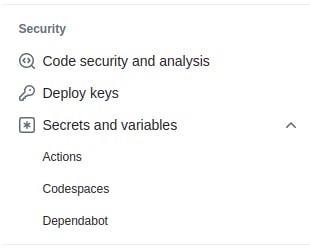
Click on Actions -> New repository secret.
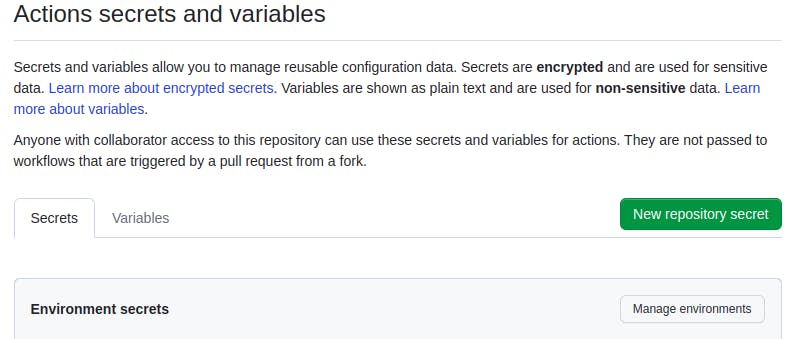
Enter your Secret name and its value, then click on Add secret.
Follow the same to add other secrets. Secrets are successfully added to your repository.
till this step, you will be able to successfully build and run your pipeline.
On doing docker ps on your EC2 machine you will be able to list out all 3 Docker Containers. One for my-springboot-server and one for Mongo and the other one for Redis. But these three images are still running separately and not able to communicate with each other.
If you try to hit an API endpoint of my-springboot-server then it will throw an error like MongoSocketReadTimeoutException. So to get this work, the Docker network comes into the picture.
Step 6: Add your Docker images to a Docker network
Create a Docker network.
docker network create my-network
To see a list of your Docker networks.
docker network ls
Add your images to my-network.
docker network connect my-network my-springboot-server
docker network connect my-network mongo
docker network connect my-network redis
To check if your images are connected to a network, inspect my-network.
docker network inspect my-network
Also, update your deployment.yml file to automatically add your newly created Docker container to the Docker network by updating the Docker run command in the .yml file.
docker run --detach --name your_dockerhub_repo -p 7098:7098 --network my-network ${{ secrets.DOCKER_USERNAME }}/your_dockerhub_repo
After all, your GitHub action file will look like this and is ready to execute and run your pipeline.
# This workflow will build and push a new container image to Dockerhub.
# Pull the latest image from DockerHub and run on EC2

name: Build & Deploy backend server

on:
  push:
    branches: [ "development" ]

permissions:
  contents: read

jobs:
  build:

    runs-on: ubuntu-latest

    steps:
      - uses: actions/checkout@v3
      - name: Install Java 17 JDK
        uses: actions/setup-java@v3
        with:
          java-version: '17'
          distribution: 'zulu'
          cache: maven

      - name: Build with Maven
        run: mvn clean install

      - name: Build & Push Docker image
        uses: mr-smithers-excellent/docker-build-push@v5
        with:
          image: ${{secrets.DOCKER_USERNAME }}/your_dockerhub_repo
          tags: latest
          registry: docker.io
          dockerfile: Dockerfile
          username: ${{ secrets.DOCKER_USERNAME }}
          password: ${{ secrets.DOCKER_PASSWORD }}

      - name: Pull & Run Docker image
        uses: appleboy/ssh-action@master
        with:
          host: 13.212.244.119
          username: ec2-user
          key: ${{ secrets.ACTION_PRIVATE_KEY }}
          envs: GITHUB_SHA
          script: |
            docker login
            docker pull ${{ secrets.DOCKER_USERNAME }}/your_dockerhub_repo
            docker stop your_dockerhub_repo
            docker rm your_dockerhub_repo
            docker run --detach --name your_dockerhub_repo -p 7098:7098 --network my-network ${{ secrets.DOCKER_USERNAME }}/your_dockerhub_repo
Conclusion
With this automation in place, you'll be able to streamline your build and deployment process on EC2, saving time and effort while ensuring a smooth and efficient development workflow. GitHub Actions is a native feature of the GitHub platform hence it eliminates the need for external CI/CD tools or services. This makes the setup and configuration process much simpler, more accessible and delivers outstanding results.