


In a world where applications communicate with each other, passing messages back and forth in real time. Messaging queues come into play which act as the backbone of such asynchronous communication. If you're not familiar with messaging queues or just need a quick refresher, no worries! Check out my previous blog on Messaging queues.
Now, let's take our data streaming journey to the next level and dive into the exciting world of Apache Kafka!
Apache Kafka is a distributed streaming platform originally developed by LinkedIn & later on became a part of the Apache Project. It is all about Store + Process + Transfer.
History
Kafka was founded by Jay Kreps, Neha Narkhede, and Jun Rao, written in Java and Scala. It was named after the famed short-story writer and novelist Franz Kafka, as it was intended to be a System optimized for writing. The original use case for Kafka was to track a user’s actions on the LinkedIn website.
Kafka Use Cases
Activity Tracking
To provide a high-performance messaging system to track user activity (page views, click tracking, modifications to profile, etc.)
Used in scenarios where applications need to send out notifications.
Messaging
Format the message a certain way, filter a message, batch messages in a single notification
High throughput, Built-in partitioning
Metrics & Logging
Gives a clearer abstraction of logs
Applications can publish metrics to Kafka topics which can then be consumed by monitoring and alerting systems.
Kafka Components
Topics
Topic groups the related messages & stores them. A Kafka topic is like a folder in a file system.
A consumer pulls messages from a Kafka topic while a producer pushes messages into a Kafka topic. A topic can have many producers or consumers.
Partitions
A partition is the smallest storage unit that holds a subset of records owned by a topic. Kafka's topics are divided into several Partitions.
Replica
Replicas are the number of cloned/duplicate messages created to send messages to consumers through a message broker. After creating replicas one of them should be selected as a leader.
Messages
A unit of data in Kafka is a message. Messages can be database records, logs, transactions, etc.
Each message(record) consists of a key, value, and timestamp.
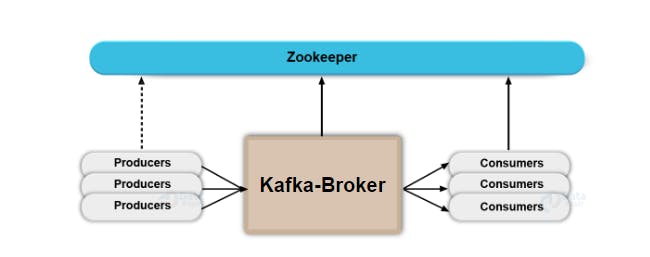
Broker
A single Kafka server is called a broker. Usually, several Kafka brokers operate as one Kafka cluster. The cluster is controlled by one of the brokers, called the controller, which is responsible for administrative actions such as assigning partitions to other brokers and monitoring for failures.
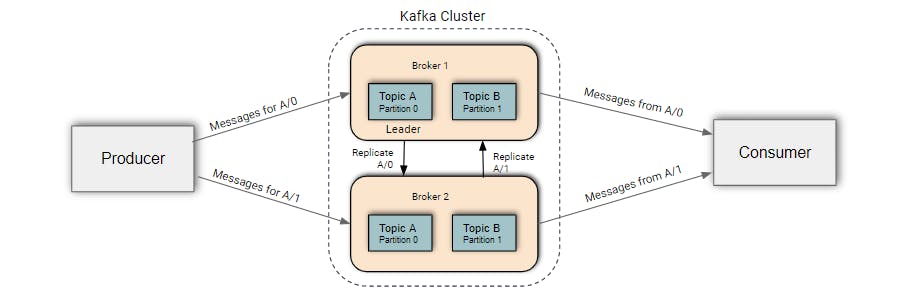
Producer
The applications that create messages and push them into the queue are called producers.
Consumer
The applications that go through the queue and receive those messages are called consumers.
Zookeeper
Zookeeper is used to elect Controller. Zookeeper makes sure there is only one Controller and Elect new one if it crashes.
Controller
A Controller is one of the Brokers & is responsible for maintaining leader relationships for all the partitions. When a node shuts down, The controller tells other replicas to become partition leaders.
Kafka Features
High Throughput
Throughput is the amount of data passing through a system or process. In terms of Kafka, Producer throughput is the number of messages getting produced. Consumer throughput is the number of messages i.e. getting consumed.
Scalability
As Kafka is a linearly scalable module, we can scale up or scale down without any downtime.
Data loss
With proper configuration, Kafka ensures no data loss.
Reliability
Maintains performance under high data volume load, Prevents any unauthorized use or abuse of the system when failures do happen.
Installation on Ubuntu
Installing Java
Need to have Java installed before installing Kafka.
 sudo apt update
 sudo apt install default-jdk
Verify by checking current version of Java
java --versionIt will show output similar to
openjdk version "11.0.15" 2022-04-19OpenJDK Runtime Environment (build 11.0.15+10-Ubuntu-0ubuntu0.22.04.1)OpenJDK 64-Bit Server VM (build 11.0.15+10-Ubuntu-0ubuntu0.22.04.1, mixed mode, sharing)Download the Latest Apache Kafka
You can download the latest Apache Kafka binary files from its official download page. Alternatively, you can download Kafka 3.2.0 with the below command.
wget https://downloads.apache.org/kafka/3.5.0/kafka_2.13-3.5.0.tgzThen extract the downloaded archive file and place them under /usr/local/kafka directory.
 tar xzf kafka_2.13-3.2.0.tgz
 sudo mv kafka_2.13-3.2.0 /usr/local/kafka
Create Systemd Startup Scripts
First, create a systemd unit file for Zookeeper:
sudo nano /etc/systemd/system/zookeeper.serviceAnd add the following content:
 [Unit]
 Description=Apache Zookeeper server
 Documentation=http://zookeeper.apache.org
 Requires=network.target remote-fs.target
 After=network.target remote-fs.target

 [Service]
 Type=simple
 ExecStart=/usr/local/kafka/bin/zookeeper-server-start.sh /usr/local/kafka/config/zookeeper.properties
 ExecStop=/usr/local/kafka/bin/zookeeper-server-stop.sh
 Restart=on-abnormal

 [Install]
 WantedBy=multi-user.target
Next, create a systemd unit file for the Kafka service:
sudo nano /etc/systemd/system/kafka.serviceSet the correct JAVA_HOME path as per the Java installed on your system.
 [Unit]
 Description=Apache Kafka Server
 Documentation=http://kafka.apache.org/documentation.html
 Requires=zookeeper.service

 [Service]
 Type=simple
 Environment="JAVA_HOME=/usr/lib/jvm/java-11-openjdk-amd64"
 ExecStart=/usr/local/kafka/bin/kafka-server-start.sh /usr/local/kafka/config/server.properties
 ExecStop=/usr/local/kafka/bin/kafka-server-stop.sh

 [Install]
 WantedBy=multi-user.target
Reload the systemd daemon to apply new changes.
sudo systemctl daemon-reloadStart Zookeeper and Kafka Services
 sudo systemctl start zookeeper
 sudo systemctl start kafka
Verify both of the service's statuses:
 sudo systemctl status zookeeper
 sudo systemctl status kafka
You have successfully installed the Apache Kafka server on the Ubuntu system. Now let's look into how to create topics in the Kafka server.
Create a Topic in Kafka
Move into your Kafka installation directory. Create a topic named “testTopic” with a single partition with a single replica:
bin/kafka-topics.sh --create --bootstrap-server localhost:9092 --replication-factor 1 --partitions 1 --topic testTopic
In the above command,
bin/kafka-topics.sh --create specifies creating a topic.
--bootstrap-server localhost:9092 specifies the Kafka server port. By default, Kafka runs on port 9092.
--replication-factor we can specify how many replicas we want to create. Here we are creating a single replica.
--partitions represents a number of partitions.
And last but not least, In --topic we mention a topic name.
Get a list of topics
bin/kafka-topics.sh --list --bootstrap-server localhost:9092
Get a description of a topic
bin/kafka-topics.sh --describe --bootstrap-server localhost:9092 --topic testTopic
Send data to Kafka topic (Producer Node)
bin/kafka-console-producer.sh --broker-list localhost:9092 --topic testTopic
Receive data from the Kafka topic (Consumer Node)
bin/kafka-console-consumer.sh --bootstrap-server localhost:9092 --topic testTopic --from-beginning
Conclusion
In this article, we explored the fundamentals of Apache Kafka and discovered how it enables seamless communication between senders and receivers using the command line. However, if you're eager to delve deeper into the topic and learn how to establish communication between different Spring Boot applications using Kafka, I invite you to check out my Apache Kafka Implementation on my GitHub profile.
Thank you for Reading!